
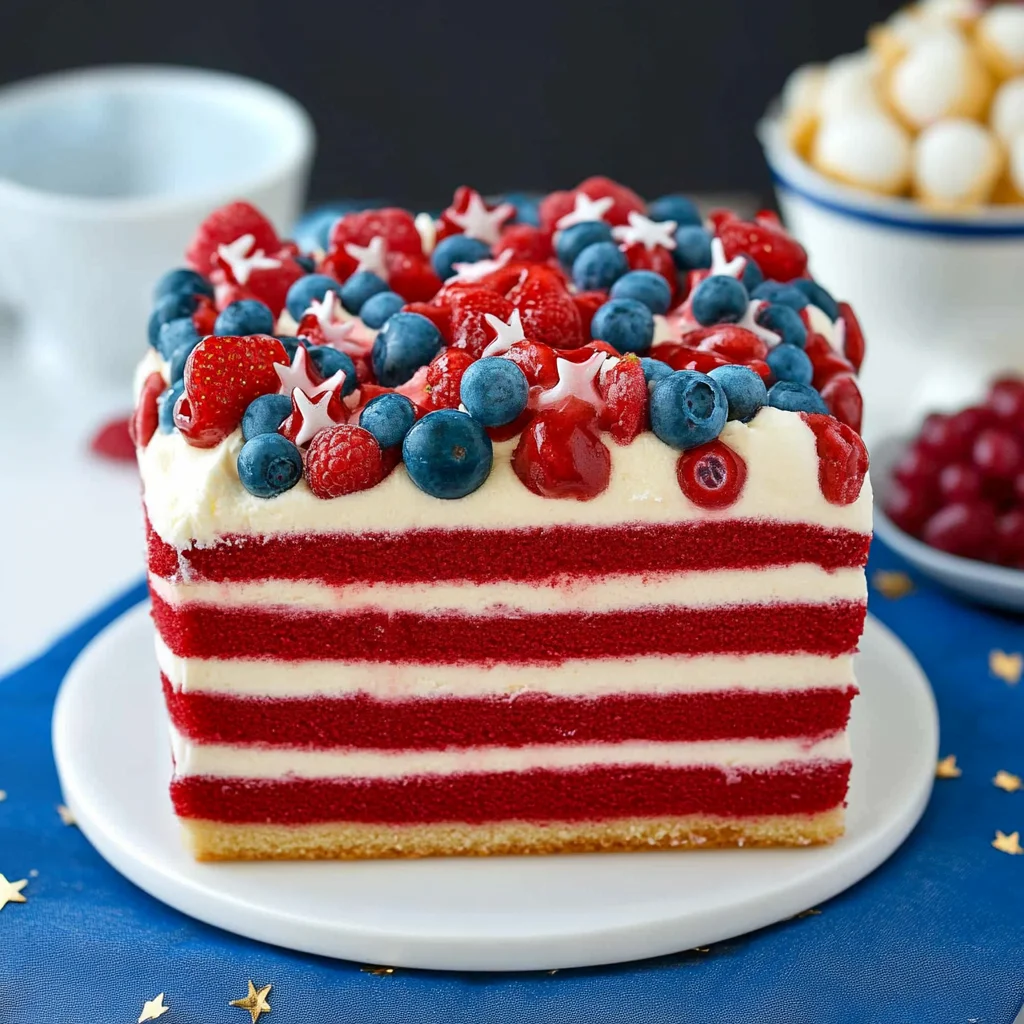
You’re only five ingredients away from this festive Easy July 4th Ice Cream Cake that layers pound cake, ice cream, whipped cream, and sprinkles. This simple yet stunning dessert not only captures the spirit of the holiday but also delights guests of all ages. Perfect for barbecues, picnics, or family gatherings, this treat stands out with its creamy texture and vibrant red, white, and blue colors.
Why You’ll Love This Recipe
- Simple to Prepare: With just five ingredients and minimal prep time, you can whip up this cake quickly.
- Versatile Flavor Options: Swap raspberry ice cream for your favorite flavors to customize it for any occasion.
- Festive Presentation: The colorful layers and sprinkles make it a show-stopping dessert that looks as good as it tastes.
- No Baking Required: Since this cake is made with frozen ingredients, you can avoid the heat of the oven on a warm summer day.
- Perfect for Sharing: With eight servings, it’s an ideal dessert to bring to gatherings with friends and family.
Tools and Preparation
To make your Easy July 4th Ice Cream Cake efficiently, you’ll need a few essential tools. Having the right equipment will ensure a smooth preparation process.
Essential Tools and Equipment
- Plastic wrap
- Serrated knife
- Container (for layering)
- Serving platter
Importance of Each Tool
- Plastic wrap: Helps in easy removal of the cake from the container while keeping it secure during freezing.
- Serrated knife: Makes slicing through the pound cake easier and ensures clean cuts without crumbling.
- Container: Provides structure for layering your cake and makes serving straightforward.
Ingredients
For the Cake Layers
- 1 (16-oz.) frozen pound cake
- 1 1/2 pints raspberry ice cream or sorbet
For Topping
- 1 1/2 cups homemade whipped cream or whipped topping
- 1/2 cup raspberries, for topping
- 1/2 cup blueberries, for topping
- Red, white and blue sprinkles, for topping

How to Make Easy July 4th Ice Cream Cake
Step 1: Prepare the Container
Remove the pound cake from the container and set it aside. Line the container with plastic wrap so that it hangs over on all sides.
Step 2: Slice the Pound Cake
Using a serrated knife:
1. Carefully slice the pound cake in half lengthwise.
2. Slice each piece in half again to form four long slices.
Step 3: Layering the Cake
Arrange the bottom slice in the lined container. Top it with a third of the ice cream:
* Spread into an even layer.
Add a second slice of pound cake atop the ice cream:
1. Top it with another third of ice cream.
2. Place another layer of pound cake followed by the remaining ice cream.
3. Finish with the top layer of pound cake.
Step 4: Freeze Until Solid
Wrap the plastic wrap securely around the cake. Place it in the freezer until frozen solid, about 6 hours.
Step 5: Serve Your Cake
When ready to serve:
1. Remove from freezer using plastic wrap overhangs to lift out onto a serving platter.
2. Top with whipped cream, raspberries, blueberries, and sprinkles.
3. Slice and serve immediately!
How to Serve Easy July 4th Ice Cream Cake
This Easy July 4th Ice Cream Cake is not only delicious but also visually appealing, making it perfect for summer gatherings. Here are some creative ways to serve this festive dessert.
Individual Servings
- Use small cups or bowls for serving individual portions. This makes it easy for guests to enjoy without cutting the cake.
- Top each serving with a dollop of whipped cream and a sprinkle of extra berries for an added touch.
Family Style
- Place the entire cake on a large platter and let guests serve themselves. This encourages sharing and adds to the festive atmosphere.
- Consider adding extra sprinkles on top for a colorful presentation that matches the July 4th theme.
With Fresh Fruit
- Serve slices of the cake alongside fresh fruit like strawberries or additional raspberries and blueberries. This complements the flavors and adds freshness.
- Create a small fruit salad as a side option, enhancing the healthy aspect of your dessert table.
Decorated Plates
- For a more elegant presentation, drizzle chocolate or raspberry sauce on the plates before placing a slice of cake. This adds visual appeal and extra flavor.
- Garnish with mint leaves for an extra pop of color and freshness.
How to Perfect Easy July 4th Ice Cream Cake
To ensure your Easy July 4th Ice Cream Cake turns out perfectly every time, follow these essential tips.
- Use high-quality ice cream – Opt for premium ice cream or sorbet for better texture and flavor.
- Freeze between layers – If you’re layering different flavors, freeze each layer briefly before adding the next to maintain distinct layers.
- Chill your tools – Keep your mixing bowl and beaters cold when making whipped cream; this helps achieve better volume.
- Avoid melting – Don’t let your ice cream sit out too long before assembling; it should be soft but not melted.
- Wrap well – Be sure to wrap your cake tightly in plastic wrap before freezing to avoid freezer burn.
- Let it rest before slicing – Allow the cake to sit at room temperature for about 5 minutes before slicing for cleaner cuts.
Best Side Dishes for Easy July 4th Ice Cream Cake
Pairing side dishes with your Easy July 4th Ice Cream Cake can enhance your dessert spread. Here are some great options to consider.
- Grilled Peaches – Sweet grilled peaches provide a warm contrast to the cold ice cream cake, adding delicious flavor.
- Berry Salad – A fresh berry salad combining strawberries, blueberries, and raspberries offers a light and refreshing balance.
- Patriotic Fruit Skewers – Assemble skewers with red strawberries, white bananas, and blue blueberries for a fun and festive treat.
- Mini Cheesecakes – These rich desserts can complement the lightness of the ice cream cake while providing variety on the dessert table.
- Lemonade Spritzers – A refreshing beverage like lemonade spritzers enhances the summer vibe while pairing nicely with sweet treats.
- Caprese Salad – The fresh basil and mozzarella provide a savory contrast that balances out the sweetness of desserts nicely.
Common Mistakes to Avoid
When making this Easy July 4th Ice Cream Cake, it’s essential to avoid a few common pitfalls that can detract from the final result.
- Skipping the Freezing Time: Not allowing the cake to freeze long enough can lead to a mushy texture. Make sure to freeze it for at least 6 hours for the best results.
- Using Thawed Pound Cake: Ensure that your pound cake is frozen before slicing. A thawed cake can crumble and make layering difficult.
- Overfilling with Ice Cream: Adding too much ice cream can cause overflow when you layer. Stick to the recommended amounts for a neat presentation.
- Not Using Plastic Wrap: Failing to line your container with plastic wrap can make it challenging to remove the cake later. Always use wrap for easy lifting.
- Neglecting Toppings: Skipping toppings like whipped cream and sprinkles can make your dessert less festive. Don’t forget these finishing touches!
Storage & Reheating Instructions
Refrigerator Storage
- item Keep the Easy July 4th Ice Cream Cake in an airtight container in the refrigerator.
- item It will stay fresh for up to 2 days.
Freezing Easy July 4th Ice Cream Cake
- item If you want to store leftovers, wrap them tightly in plastic wrap and then foil.
- item The cake can be frozen for up to 2 weeks without losing flavor or texture.
Reheating Easy July 4th Ice Cream Cake
- Oven: Preheat your oven to 350°F (175°C) and place slices on a baking sheet. Heat for about 5-10 minutes until just warm.
- Microwave: Use a microwave-safe plate and heat individual slices for about 15-20 seconds. Be careful not to melt too much.
- Stovetop: Place slices in a skillet over low heat, covered, and warm for about 5 minutes until soft.
Frequently Asked Questions
How long does the Easy July 4th Ice Cream Cake last?
This dessert stays fresh in the refrigerator for up to 2 days or in the freezer for up to 2 weeks.
Can I customize my Easy July 4th Ice Cream Cake?
Absolutely! Feel free to swap out flavors of ice cream or add different fruits based on what you enjoy.
What type of pound cake should I use?
You can use any frozen pound cake, but homemade versions often yield better flavor and texture.
Is this dessert suitable for kids?
Yes! The Easy July 4th Ice Cream Cake is family-friendly and perfect for kids’ celebrations.
Final Thoughts
This Easy July 4th Ice Cream Cake is not only festive but also incredibly versatile. With just five ingredients, it’s simple enough for anyone to make while allowing room for creativity. Try different flavors of ice cream or mix in your favorite fruits! Enjoy this delightful treat during your summer celebrations.

Easy July 4th Ice Cream Cake
- Total Time: 22 minute
- Yield: Serves 8
Description
This Easy July 4th Ice Cream Cake is the perfect summer dessert, combining layers of fluffy pound cake, creamy raspberry ice cream, and sweet whipped topping, all adorned with vibrant red, white, and blue sprinkles. With just five ingredients and no baking required, this delightful cake is not only simple to prepare but also a visual showstopper at any gathering. Whether you’re hosting a backyard barbecue or enjoying a picnic with family, this festive treat will be a hit for guests of all ages. Customize it with your favorite ice cream flavors or fruits to make it uniquely yours. Get ready to impress your friends and family with this deliciously easy dessert!
Ingredients
- 1 (16-oz.) frozen pound cake
- 1 1/2 pints raspberry ice cream or sorbet
- 1 1/2 cups homemade whipped cream or whipped topping
- 1/2 cup raspberries
- 1/2 cup blueberries
- Red, white, and blue sprinkles
Instructions
- Prepare your container by lining it with plastic wrap.
- Slice the frozen pound cake in half lengthwise, then cut each piece into four long slices.
- Layer the bottom slice in the container and top with a third of the raspberry ice cream. Repeat the layering process with the remaining cake slices and ice cream.
- Wrap securely in plastic wrap and freeze for at least 6 hours or until solid.
- When ready to serve, remove from the freezer using the plastic wrap to lift out onto a serving platter. Top with whipped cream, berries, and sprinkles.
- Prep Time: 20 minutes
- Cook Time: None
- Category: Dessert
- Method: No-Bake
- Cuisine: American
Nutrition
- Serving Size: 1 serving
- Calories: 290
- Sugar: 28g
- Sodium: 150mg
- Fat: 12g
- Saturated Fat: 7g
- Unsaturated Fat: 4g
- Trans Fat: 0g
- Carbohydrates: 40g
- Fiber: 1g
- Protein: 3g
- Cholesterol: 35mg
Keywords: For added flavor variety, try different ice cream flavors like vanilla or strawberry. Ensure your ice cream is slightly softened for easier spreading. Allow the cake to sit at room temperature for about 5 minutes before slicing for cleaner cuts.