
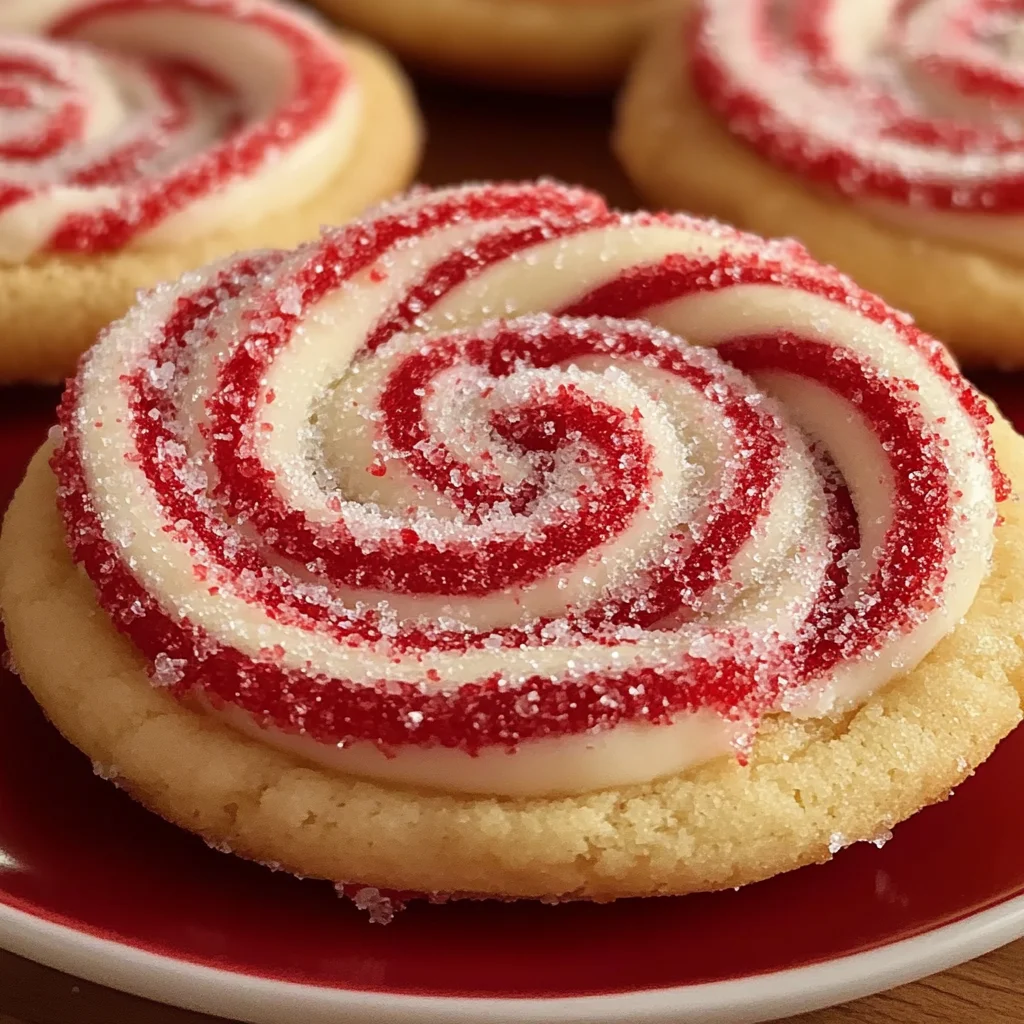
Peppermint Swirl Cookies are a delightful treat that brings festive cheer to any occasion. These cookies not only look stunning with their vibrant swirls of red and white, but they also offer a refreshing burst of peppermint flavor that makes them perfect for holiday gatherings, cookie exchanges, or simply as a sweet indulgence at home. Enjoy these cookies warm, cooled down, or even shared as gifts—each bite is sure to win hearts!
Why You’ll Love This Recipe
- Visually Stunning: The striking red and white swirls make these cookies a showstopper on any dessert table.
- Refreshing Flavor: With the perfect hint of peppermint, these cookies provide a unique twist on traditional holiday flavors.
- Easy to Make: Simple steps make this recipe accessible for bakers of all skill levels, ensuring everyone can create delicious treats.
- Versatile Occasions: Perfect for Christmas, New Year’s, or any festive gathering, these cookies are sure to impress.
- Great for Gifting: Pack them in cute tins or boxes to share with friends and family, spreading joy with every bite.
Tools and Preparation
To create your Peppermint Swirl Cookies effectively, having the right tools is essential. Gather these items before you start baking!
Essential Tools and Equipment
- Electric mixer
- Medium bowl
- Large mixing bowl
- Plastic wrap
- Rolling pin
- Parchment paper
- Sharp knife
Importance of Each Tool
- Electric mixer: Helps achieve a light and fluffy texture when creaming butter and sugar together.
- Plastic wrap: Keeps the dough chilled properly between steps to maintain its shape and prevent stickiness.

Ingredients
For the Cookie Dough
- 2 and 1/2 cups all-purpose flour
- 1 teaspoon baking powder
- 1/2 teaspoon salt
- 1 cup (2 sticks) unsalted butter, softened
- 1 cup granulated sugar
- 1 large egg
- 1 teaspoon vanilla extract
- 1 teaspoon peppermint extract
For Coloring and Coating
- Red gel food coloring
- 1/4 cup coarse sugar or crushed peppermint candies for coating
How to Make Peppermint Swirl Cookies
Step 1: Prepare the Dry Ingredients
In a medium bowl, whisk together the flour, baking powder, and salt. Set aside.
Step 2: Cream Butter and Sugar
In a large bowl, using an electric mixer, cream together the softened butter and granulated sugar until light and fluffy. Beat in the egg followed by the vanilla extract and peppermint extract until well combined.
Step 3: Combine Wet and Dry Ingredients
Gradually add the dry ingredients to the wet mixture. Mix on low speed until just combined; be careful not to overmix.
Step 4: Divide the Dough
Divide the dough in half. Leave one half plain while adding red gel food coloring to the second half. Mix until uniform in color.
Step 5: Chill the Dough
Wrap each ball of dough separately in plastic wrap. Chill in the refrigerator for at least 30 minutes. This will firm up the dough for easier handling.
Step 6: Roll Out Dough
On a lightly floured surface, roll out the plain dough into a rectangle about 10×12 inches and 1/4 inch thick. Repeat this process with the red dough.
Step 7: Layer Doughs
Carefully place the red dough rectangle on top of the plain dough rectangle. Gently press them together.
Step 8: Form a Log
Starting from one long side, roll the layered dough tightly into a log. Press gently to eliminate air pockets while rolling.
Step 9: Chill Again
Wrap the dough log tightly in plastic wrap and chill again for at least 2 hours until very firm.
Step 10: Preheat Oven
Preheat your oven to 375 degrees F (190 degrees C). Line baking sheets with parchment paper.
Step 11: Coat Dough Log
Remove the chilled log from refrigeration. If desired, brush it lightly with water or whisked egg white, then roll it in coarse sugar or crushed peppermint candies to coat evenly.
Step 12: Slice Cookies
Using a sharp knife, slice the log into rounds about 1/4 inch thick. Place them about an inch apart on prepared baking sheets.
Step 13: Bake
Bake for 8 to 10 minutes until edges are lightly golden. Avoid overbaking.
Step 14: Cool Cookies
Allow cookies to cool on baking sheets for several minutes before transferring them to a wire rack to cool completely.
With these steps completed, your Peppermint Swirl Cookies will be ready to enjoy! Serve them fresh out of the oven or store them for later—whichever way you choose, they’re sure to be a hit!
How to Serve Peppermint Swirl Cookies
Peppermint Swirl Cookies are not just delicious; they are also visually appealing and can be served in various ways to enhance their festive charm. Here are some creative serving suggestions to impress your guests.
Festive Cookie Platter
- Arrange the cookies on a large platter, mixing them with other holiday treats like chocolate-covered pretzels or gingerbread men for a colorful display.
Hot Cocoa Pairing
- Serve these cookies alongside warm cups of hot cocoa. The peppermint flavor perfectly complements the rich chocolate, creating a delightful pairing.
Gift Packaging
- Pack the cookies in decorative tins or boxes and give them as gifts. Use colorful ribbons and tags for an extra festive touch.
Ice Cream Sandwiches
- Create ice cream sandwiches by placing a scoop of peppermint or vanilla ice cream between two cookies. This makes for a fun and refreshing dessert option.
Holiday Dessert Table
- Include Peppermint Swirl Cookies on your holiday dessert table. They add a pop of color and flavor that complements other sweet treats.
Cookie Decorating Station
- Set up a cookie decorating station where guests can customize their own cookies with icing, sprinkles, or additional crushed peppermint candies.
How to Perfect Peppermint Swirl Cookies
Perfecting your Peppermint Swirl Cookies guarantees delightful results every time. Follow these tips to elevate your baking game.
Chill the Dough: Chilling the dough allows it to firm up, making it easier to roll out without sticking together or bleeding colors.
Use Gel Food Coloring: Opt for gel food coloring instead of liquid for vibrant swirls that won’t alter the dough’s consistency.
Tight Rolling: When rolling the layered dough into a log, ensure it’s tight to maintain defined swirls and prevent gaps during baking.
Even Slicing: Use a sharp knife for slicing the dough into uniform rounds for consistent baking times and even cookie shapes.
Watch Baking Time: Keep an eye on the cookies while they bake; remove them from the oven when edges are lightly golden to avoid overbaking.
Cool Properly: Let cookies cool on baking sheets before transferring them to wire racks to set properly without losing shape.
Best Side Dishes for Peppermint Swirl Cookies
Pairing side dishes with Peppermint Swirl Cookies can enhance your holiday spread. Here are some delightful options that complement these sweet treats well.
Hot Chocolate: A creamy cup of hot chocolate adds warmth and richness, perfect alongside peppermint flavors.
Spiced Apple Cider: Warm spiced apple cider gives a cozy touch and contrasts nicely with the sweetness of the cookies.
Cheese Platter: A selection of cheeses like brie or goat cheese provides a savory balance to sweet desserts.
Fruit Salad: A fresh fruit salad offers a light, refreshing contrast that cleanses the palate after indulging in sweets.
Nut Mix: A bowl of assorted nuts adds crunch and saltiness, enhancing the overall flavor experience with each bite.
Yogurt Parfait: Layer yogurt with granola and berries for a nutritious snack that pairs well with dessert options.
Ginger Tea: A warm cup of ginger tea offers spice and warmth, making it an ideal beverage alongside sweet cookies.
Vegetable Platter: Fresh veggies served with dip provide a healthy counterbalance to sugary delights and encourage snacking flexibility.
Common Mistakes to Avoid
When making Peppermint Swirl Cookies, it’s easy to make a few common mistakes that can affect the final result. Here are some tips to help you get it right.
- Overmixing the dough – Mixing too much can lead to tough cookies. Mix just until combined for a soft texture.
- Not chilling the dough – Skipping the chilling step can cause the colors to bleed and affect the swirl. Always chill your dough as instructed.
- Incorrect rolling technique – Rolling the dough too thin may result in fragile swirls. Aim for about 1/4 inch thickness for sturdy cookies.
- Baking at the wrong temperature – Ensure your oven is preheated correctly. Baking at a lower temperature can lead to uneven cooking.
- Using stale ingredients – Check your baking powder and extracts for freshness. Stale ingredients can alter flavor and texture.
Storage & Reheating Instructions
Refrigerator Storage
- Store cookies in an airtight container.
- They will stay fresh for up to one week.
Freezing Peppermint Swirl Cookies
- Place cookies in a single layer on a baking sheet before freezing.
- Once frozen, transfer them to a freezer-safe bag or container; they can be stored for up to three months.
Reheating Peppermint Swirl Cookies
- Oven – Preheat to 350°F (175°C) and warm cookies for about 5 minutes.
- Microwave – Heat one cookie at a time for about 10-15 seconds for a soft texture.
- Stovetop – Place cookies on a skillet over low heat, cover, and warm for 2-3 minutes.
Frequently Asked Questions
Here are some frequently asked questions regarding Peppermint Swirl Cookies that might help you while baking.
How do I achieve perfect swirls in my Peppermint Swirl Cookies?
To achieve sharp swirls, ensure you chill both layers of dough separately before rolling them together tightly into a log.
Can I customize my Peppermint Swirl Cookies?
Absolutely! You can add chocolate chips or use different food colorings for varied designs and flavors.
What is the best way to store Peppermint Swirl Cookies?
Store your cookies in an airtight container at room temperature or freeze them for longer-lasting freshness.
Can I make these cookies ahead of time?
Yes! You can prepare the dough and freeze it before baking or bake the cookies ahead of time and store them properly.
Final Thoughts
Peppermint Swirl Cookies are not only visually stunning but also delightfully tasty, making them a perfect treat for any festive occasion. Feel free to customize them with additional flavors or toppings to suit your taste. We encourage you to try this recipe and enjoy delightful holiday baking!

Peppermint Swirl Cookies
- Total Time: 40 minutes
- Yield: Approximately 24 cookies 1x
Description
Peppermint Swirl Cookies are a visually stunning treat that adds a burst of festive cheer to any celebration. With their vibrant red and white swirls, these cookies not only catch the eye but also deliver a refreshing peppermint flavor that is perfect for holiday gatherings or cozy evenings at home.
Ingredients
- 2 and 1/2 cups all-purpose flour
- 1 teaspoon baking powder
- 1/2 teaspoon salt
- 1 cup unsalted butter, softened
- 1 cup granulated sugar
- 1 large egg
- 1 teaspoon vanilla extract
- 1 teaspoon peppermint extract
- Red gel food coloring
- Coarse sugar or crushed peppermint candies for coating
Instructions
- In a medium bowl, whisk flour, baking powder, and salt; set aside.
- In a large bowl, cream together softened butter and sugar with an electric mixer until fluffy. Add egg, vanilla extract, and peppermint extract; mix until combined.
- Gradually add dry ingredients to the wet mixture on low speed until just combined.
- Divide dough in half; leave one half plain and color the other with red gel food coloring until uniform.
- Chill both dough halves wrapped in plastic wrap for at least 30 minutes.
- Roll out each dough into rectangles about 10×12 inches & 1/4 inch thick.
- Layer red dough on top of plain dough and roll tightly into a log, then chill again for at least 2 hours.
- Preheat oven to 375°F (190°C) and line baking sheets with parchment paper.
- Brush chilled log with water or whisked egg white, roll in coarse sugar or crushed peppermint candies, slice into rounds, and bake for 8 to 10 minutes.
- Prep Time: 30 minutes
- Cook Time: 10 minutes
- Category: Dessert
- Method: Baking
- Cuisine: American
Nutrition
- Serving Size: 1 cookie (20g)
- Calories: 100
- Sugar: 8g
- Sodium: 50mg
- Fat: 5g
- Saturated Fat: 3g
- Unsaturated Fat: 2g
- Trans Fat: 0g
- Carbohydrates: 12g
- Fiber: <1g
- Protein: <1g
- Cholesterol: 15mg
Keywords: Ensure you chill the dough thoroughly to maintain defined swirls and prevent colors from bleeding during baking.