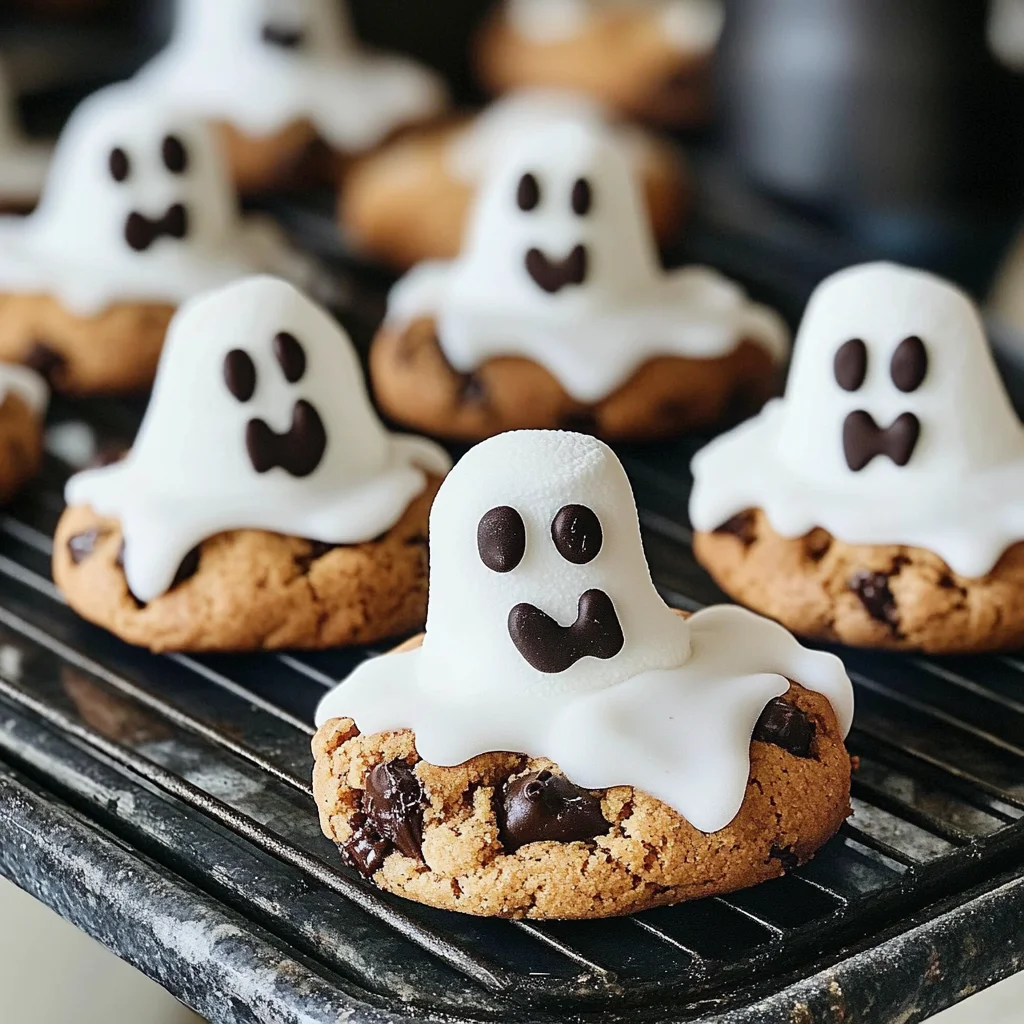
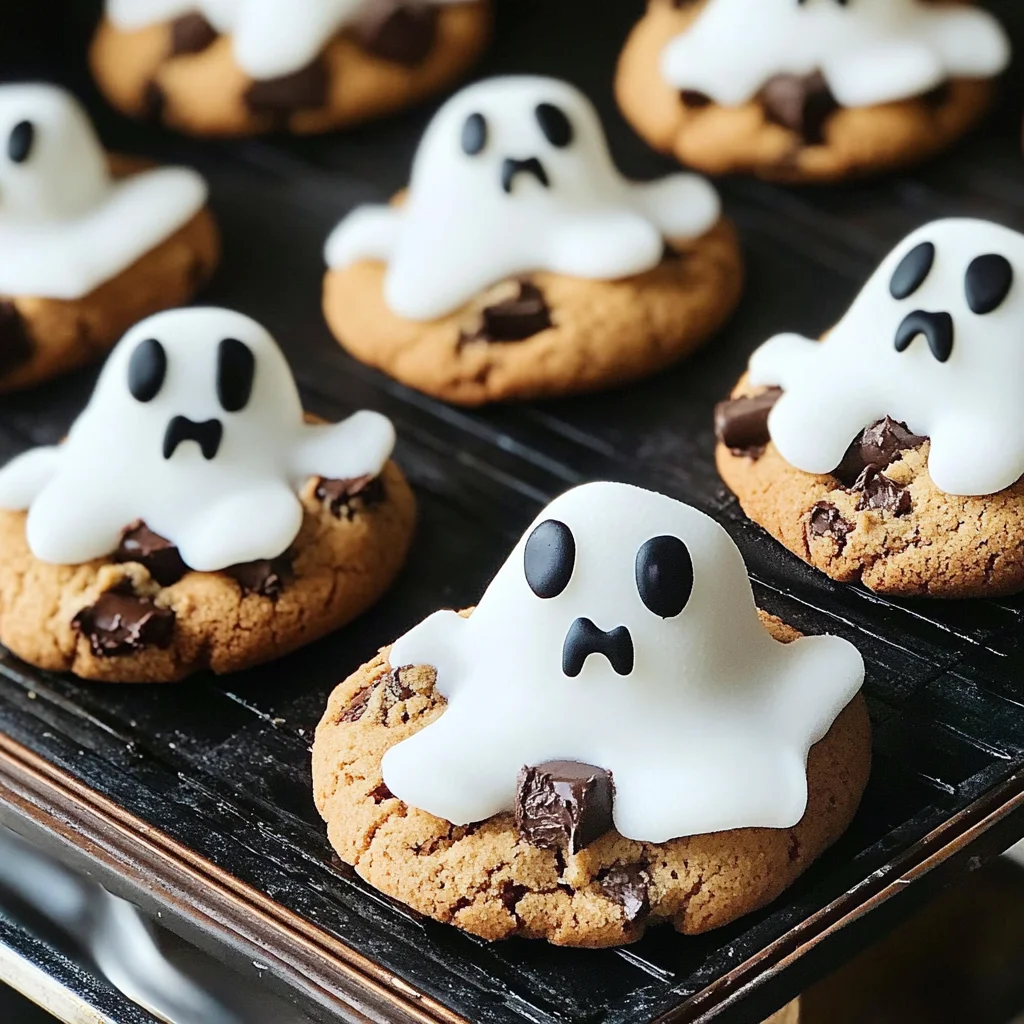
These ghost cookies are the perfect spooky addition to your Halloween festivities! With their playful appearance and easy preparation, they appeal to both kids and adults alike. These treats are ideal for parties, school events, or simply enjoying at home while watching your favorite Halloween movies. Plus, they are fun to make and customize, making them a standout choice for any Halloween celebration.
Why You’ll Love This Recipe
- Quick Preparation: These ghost cookies come together in just 25 minutes, making them a last-minute treat option.
- Fun for All Ages: Kids will love decorating these spooky cookies, providing an engaging activity for family gatherings.
- Versatile Treat: You can easily swap out ingredients or add additional decorations to suit your taste or theme.
- No Baking Required: Using store-bought cookies means you skip the baking time while still delivering delicious results.
Tools and Preparation
Before diving into making your ghost cookies, gather the necessary tools to ensure a smooth process. Having everything ready will make decorating easier!
Essential Tools and Equipment
- Mixing bowl
- Spatula
- Piping bag
- Baking sheet
Importance of Each Tool
- Mixing bowl: Essential for combining ingredients like icing sugar and marshmallows smoothly.
- Spatula: Perfect for spreading icing evenly on your cookies without damaging them.
- Piping bag: Ideal for precise decoration with black writing icing, allowing you to create spooky faces easily.

Ingredients
Get ready to create some delightful ghost cookies with these simple ingredients:
For the Ghost Cookies
- 175g icing sugar
- 1 x 200g pack chocolate chunk cookies
- 9 vegan marshmallows (regular size)
- black writing icing
How to Make Ghost cookies
Step 1: Prepare Your Surface
Start by cleaning your work area thoroughly. Lay out all your ingredients and tools so that everything is within reach.
Step 2: Make the Icing
In a mixing bowl, combine the icing sugar with a little water until you achieve a thick yet spreadable consistency. Adjust as needed.
Step 3: Decorate the Cookies
Spread a layer of icing over each chocolate chunk cookie. Ensure even coverage for a smooth base.
Step 4: Add the Marshmallows
Place one vegan marshmallow on top of each iced cookie. This will be the ghost’s body.
Step 5: Create Ghost Faces
Using the black writing icing, pipe spooky eyes and mouths onto each marshmallow. Get creative with different expressions!
Step 6: Let Them Set
Allow the icing to set for about 10 minutes before serving or storing. Enjoy your delicious ghost cookies!
How to Serve Ghost cookies
Ghost cookies are not just a treat; they are a fun centerpiece for any Halloween gathering. Whether you’re hosting a spooky party or just looking for a festive snack, these cookies can be served in various creative ways.
Creative Presentations
- Cookie Platter: Arrange the ghost cookies on a decorative platter surrounded by Halloween-themed items like mini pumpkins and fake cobwebs.
- Individual Treat Bags: Place each cookie in small, clear plastic bags tied with orange or black ribbons for guests to take home.
- Cupcake Stand: Stack the ghost cookies on a tiered cupcake stand for an eye-catching display at your Halloween event.
Fun Pairings
- Hot Cocoa: Serve ghost cookies alongside warm cups of hot cocoa topped with marshmallows for a cozy treat.
- Spooky Punch: Complement the cookies with a vibrant, fruity punch that adds to the Halloween spirit.
- Milk Shots: Offer mini glasses of milk as a tasty dip for the cookies, enhancing their flavor and making them even more delightful.
How to Perfect Ghost cookies
To ensure your ghost cookies turn out perfectly every time, consider these helpful tips.
- Bold choice of chocolate chunk cookies: Choose high-quality chocolate chunk cookies for a richer flavor that pairs well with the sweetness of icing and marshmallows.
- Bold icing technique: Use smooth strokes when applying icing to achieve a clean look. Practice on parchment paper if needed!
- Bold marshmallow placement: Ensure marshmallows are evenly spaced on each cookie so they resemble classic ghosts.
- Bold decorations: Get creative with your black writing icing! Draw funny faces or spooky designs to add personality to each cookie.
Best Side Dishes for Ghost cookies
Ghost cookies can be paired wonderfully with various side dishes that enhance your Halloween spread. Here are some great options:
- Bold Pumpkin Soup: A warm, creamy pumpkin soup that complements the sweetness of the ghost cookies perfectly.
- Bold Veggie Platter: A colorful assortment of fresh vegetables served with hummus or ranch dressing adds crunch and freshness.
- Bold Cheese Board: Include an array of cheeses, crackers, and fruits for a savory balance to your sweet treats.
- Bold Fruit Salad: A mix of seasonal fruits like apples, oranges, and grapes provides a refreshing contrast to the rich flavors of the cookies.
- Bold Popcorn Mix: Create a spooky popcorn mix using caramel corn and candy corn for an extra sweet touch.
- Bold Mini Sandwiches: Bite-sized sandwiches filled with turkey or cheese can add heartiness to your dessert-focused table.
Common Mistakes to Avoid
- It’s easy to make some errors when preparing ghost cookies. Here are common pitfalls and tips to steer clear of them:
- Skipping the icing sugar: Not using enough icing sugar can make your ghost cookies less sweet and less visually appealing. Always measure accurately.
- Overheating the cookies: Baking cookies for too long can lead to a dry texture. Keep an eye on them, and take them out just when they’re golden.
- Wrong marshmallow size: Using larger marshmallows can overwhelm the cookie. Stick to standard-sized vegan marshmallows for perfect proportions.
- Neglecting decoration: A simple finish can make your ghost cookies look less festive. Get creative with black writing icing for that spooky touch.
- Storing incorrectly: Keeping ghost cookies in a non-airtight container can lead to staleness. Use airtight containers to maintain freshness.
Storage & Reheating Instructions
Refrigerator Storage
- Store ghost cookies in an airtight container.
- They will stay fresh for up to 3 days in the refrigerator.
Freezing Ghost cookies
- Wrap each cookie individually in plastic wrap or foil.
- Place them in a freezer-safe container or bag; they can be frozen for up to 2 months.
Reheating Ghost cookies
- Oven: Preheat to 350°F (175°C) and heat the cookies for about 5-7 minutes until warm.
- Microwave: Heat one cookie at a time on medium power for about 10-15 seconds.
- Stovetop: Place a pan over low heat, cover, and warm the cookies for a few minutes.
Frequently Asked Questions
Here are some common questions about making ghost cookies:
What are ghost cookies?
Ghost cookies are fun, festive treats made by decorating chocolate chunk cookies with vegan marshmallows and black icing, perfect for Halloween.
How do you make ghost cookies?
To make ghost cookies, prepare chocolate chunk cookies, top them with vegan marshmallows, and decorate with black writing icing for a spooky effect.
Can I customize my ghost cookies?
Absolutely! You can use different shapes of marshmallows or add colorful sprinkles to personalize your ghost cookie creations.
How long do ghost cookies last?
When stored properly in an airtight container, ghost cookies can last up to 3 days in the refrigerator and up to 2 months when frozen.
Final Thoughts
These ghost cookies are not just delightful treats; they’re also versatile and easy to customize! Whether you’re hosting a Halloween party or just want some spooky snacks, these festive delights will surely impress. Try adding various toppings or changing the cookie base to suit your taste!

Ghost Cookies
- Total Time: 15 minutes
- Yield: Makes approximately 9 ghost cookies 1x
Description
Create delightful Ghost Cookies this Halloween with this simple, no-bake recipe that’s perfect for parties or cozy nights in. These spooky treats combine the rich flavor of chocolate chunk cookies topped with fluffy vegan marshmallows and decorated with playful black icing to create adorable ghostly faces. They are not only fun to make but also allow for creativity in decorating, making them a hit among kids and adults alike. Enjoy these whimsical cookies as a charming centerpiece at your Halloween gathering or as a festive snack while watching your favorite spooky movies!
Ingredients
- 175g icing sugar
- 1 x 200g pack chocolate chunk cookies
- 9 vegan marshmallows (regular size)
- black writing icing
Instructions
- Prepare your work surface by cleaning it thoroughly and laying out all ingredients and tools.
- In a mixing bowl, combine icing sugar with a little water until you reach a thick yet spreadable consistency.
- Spread an even layer of icing over each chocolate chunk cookie.
- Place one vegan marshmallow on top of each iced cookie to form the ghost's body.
- Use black writing icing to pipe spooky eyes and mouths onto the marshmallows, creating various expressions.
- Allow the icing to set for about 10 minutes before serving or storing.
- Prep Time: 15 minutes
- Cook Time: 0 minutes
- Category: Dessert
- Method: No-Bake
- Cuisine: Halloween
Nutrition
- Serving Size: 1 serving
- Calories: 150
- Sugar: 20g
- Sodium: 50mg
- Fat: 5g
- Saturated Fat: 2g
- Unsaturated Fat: 3g
- Trans Fat: 0g
- Carbohydrates: 25g
- Fiber: 1g
- Protein: 2g
- Cholesterol: 0mg
Keywords: For extra flair, consider adding colorful sprinkles or using different shapes of vegan marshmallows. Store any leftovers in an airtight container for up to 3 days in the refrigerator or freeze individually wrapped cookies for up to 2 months.