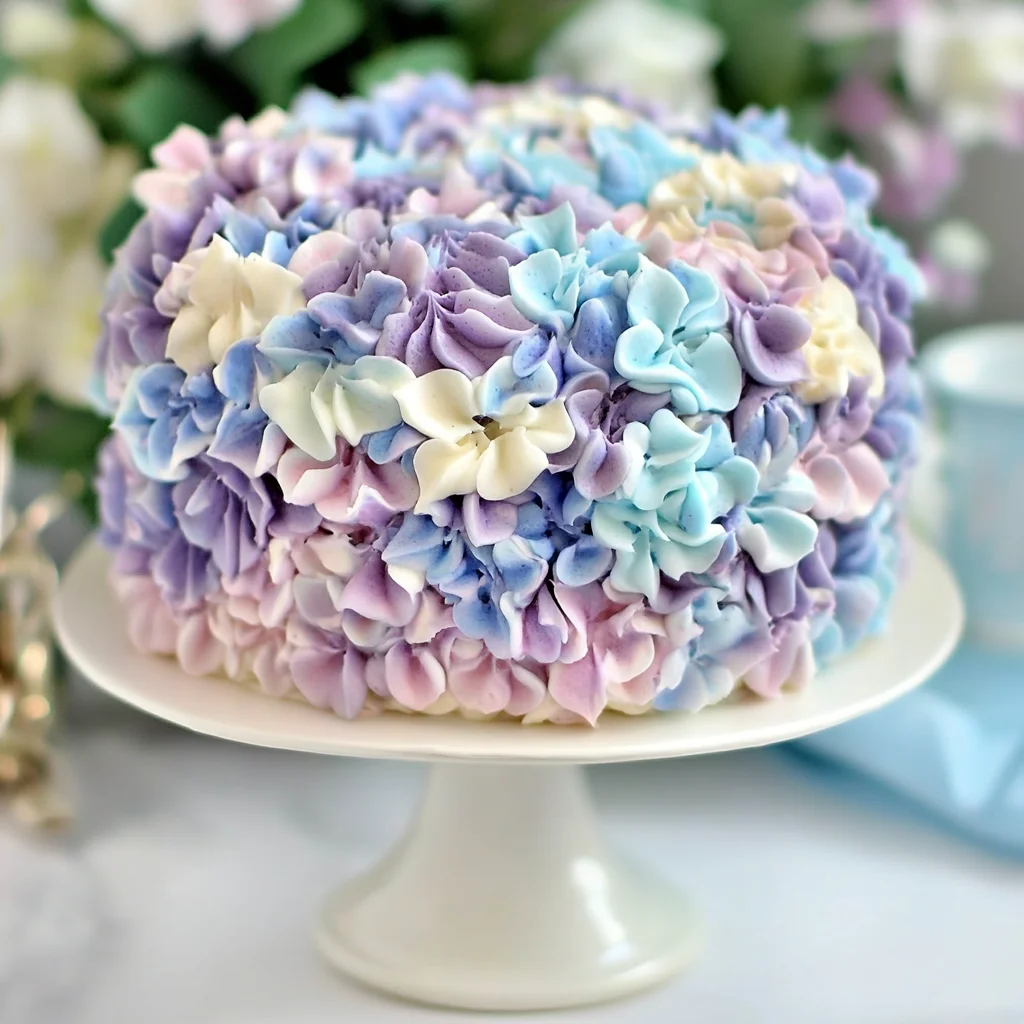
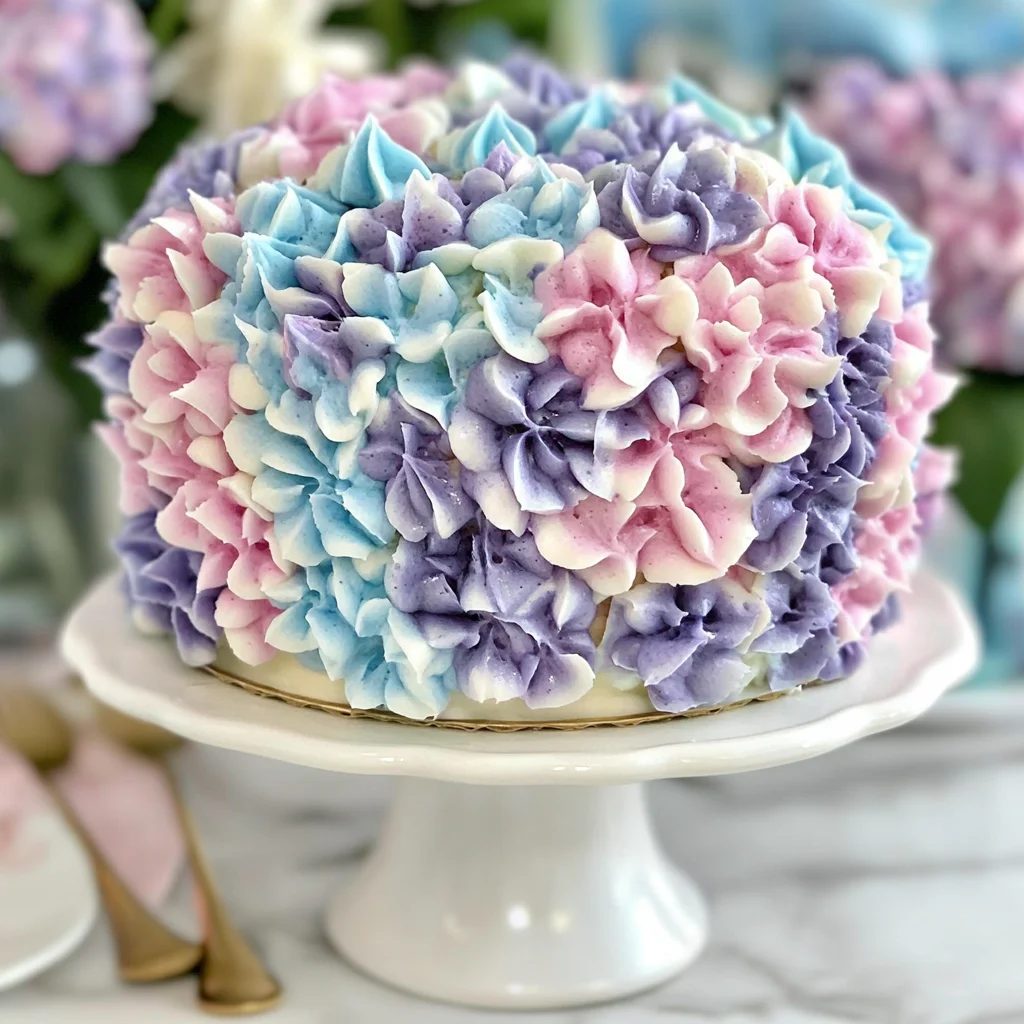
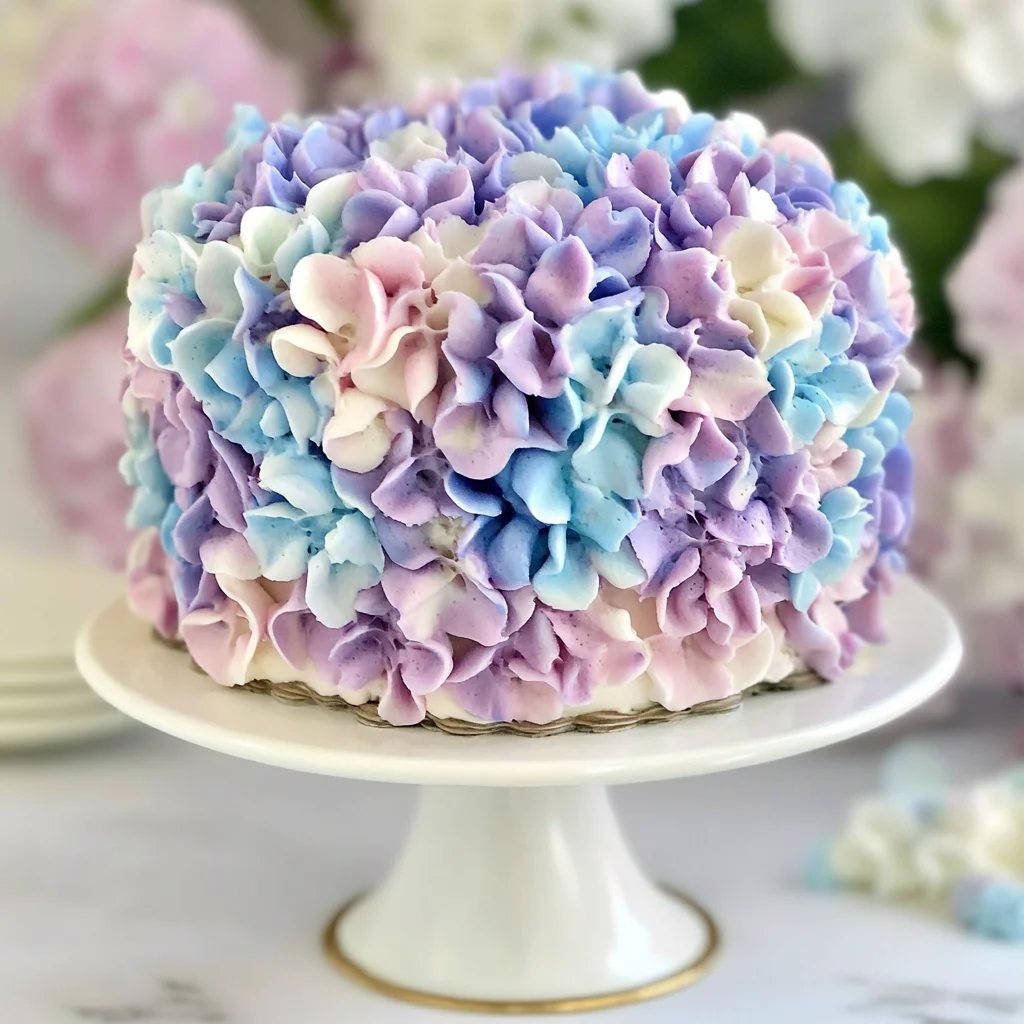
These Hydrangea Cakes are the perfect blend of beauty and flavor! Their stunning design resembles blooming hydrangea flowers, making them a delightful centerpiece for any occasion. Whether it’s a birthday party, wedding, or spring celebration, these miniature cakes will impress your guests with their vibrant colors and delicious taste. Plus, the fun process of creating these edible flowers adds to the joy of baking!
Why You’ll Love This Recipe
- Stunning Presentation: The beautiful hydrangea flower design makes these cakes visually appealing.
- Easy to Make: Despite their intricate look, these cakes are surprisingly simple to create.
- Versatile Flavor: Customize flavors with different extracts or cake mixes to suit your taste.
- Perfect for Any Occasion: Great for birthdays, weddings, and seasonal events.
- Fun Baking Activity: Involve friends or family in the decorating process for a fun experience.
Tools and Preparation
Having the right tools makes creating Hydrangea Cakes much easier and more enjoyable. Here’s what you need to get started.
Essential Tools and Equipment
- Stand mixer
- Mixing bowls
- Measuring cups
- Baking pans (miniature)
- Offset spatula
- Piping bags and tips
Importance of Each Tool
- Stand mixer: Provides consistent mixing power for a smooth batter.
- Offset spatula: Ideal for spreading frosting evenly on your cakes.
- Piping bags and tips: Allows for precise decoration to achieve that lovely hydrangea look.
Ingredients
These Hydrangea Cakes are gorgeous miniature cakes that look like hydrangea flowers! You’ll be surprised to learn how easy it is to make the pretty, colorful blossom design on the outside. The inside is beautiful, too, with swirls of multicolored cake!
For the Cake
- 10.5 oz granulated sugar (1 1/2 cups)
- 10.5 oz cake flour (2 2/3 cups)
- 4 tsp baking powder
- 3/4 tsp salt
- 4 fl oz large egg whites (1/2 cup)
- 8 fl oz milk (1 cup)
- 1 TBSP vanilla extract
- 6 oz unsalted butter (1.5 sticks), at room temperature
- Assorted gel food coloring (I used Americolor brand Electric Purple, Regal Purple, Sky Blue & Soft Pink)
For the Frosting
- 6 fl oz pasteurized liquid egg whites (3/4 cup)
- 24 oz powdered sugar (6 cups)
- ½ tsp salt
- 24 oz unsalted butter (3 sticks), at room temperature
- 2 TBSP vanilla extract
- Assorted gel food coloring (I used Americolor brand Electric Purple, Regal Purple, Sky Blue & Soft Pink)
For Garnish
- 2 tablespoons fresh parsley, finely chopped

How to Make Hydrangea Cakes
Step 1: Prepare Your Baking Pans
Grease your miniature cake pans with butter or cooking spray. Dust them lightly with flour to prevent sticking.
Step 2: Mix the Dry Ingredients
In a large mixing bowl, combine the cake flour, baking powder, and salt. Whisk them together until well mixed.
Step 3: Cream Butter and Sugar
In your stand mixer bowl, beat the unsalted butter and granulated sugar until light and fluffy. This should take about 4-5 minutes on medium speed.
Step 4: Add Wet Ingredients
Slowly add in the egg whites, milk, and vanilla extract while continuing to mix. Ensure everything is well combined.
Step 5: Combine Dry and Wet Mixtures
Gradually add the dry ingredients into your wet mixture. Mix until just combined but do not overmix.
Step 6: Divide Batter for Coloring
Divide your batter into separate bowls based on how many colors you’d like to use. Add gel food coloring into each bowl until you achieve your desired shades.
Step 7: Fill Cake Pans
Spoon alternating colors of batter into each prepared pan. Swirl gently with a toothpick or knife for a marbled effect.
Step 8: Bake Your Cakes
Bake in preheated oven at 350°F (175°C) for about 30-35 minutes or until a toothpick inserted in the center comes out clean.
Step 9: Cool Completely
Once baked, allow your cakes to cool in the pans for about ten minutes before transferring them onto wire racks to cool completely.
Step 10: Prepare Frosting
In another bowl, beat together pasteurized liquid egg whites and powdered sugar until stiff peaks form. Gradually add unsalted butter until fully incorporated and smooth. Add vanilla extract and beat until fluffy.
Step 11: Frost Your Cakes
Once cooled, frost between layers using a generous amount of frosting before stacking them up carefully.
Step 12: Decorate for Hydrangea Look
Using piping bags fitted with flower tips, pipe dollops of frosting around each mini cake to resemble hydrangeas. Finish with additional gel coloring as desired.
Now you’re ready to present your beautiful Hydrangea Cakes! Enjoy serving this delightful dessert that’s sure to impress everyone!
How to Serve Hydrangea Cakes
Serving Hydrangea Cakes is about presentation and pairing them with delightful accompaniments. These miniature cakes are not only beautiful but also versatile, making them perfect for various occasions. Here are some creative serving suggestions to enhance your dessert experience.
For Special Occasions
- Elegant Platter: Arrange the cakes on a decorative platter with fresh flowers to create a stunning centerpiece.
- Individual Portions: Serve each cake on its own mini cake stand for an elegant touch at parties.
With Complementary Drinks
- Floral Tea: Pair the cakes with a light floral tea, such as chamomile or jasmine, which enhances the overall aesthetic.
- Sparkling Lemonade: A refreshing sparkling lemonade can balance the sweetness of the cakes perfectly.
As Part of a Dessert Table
- Dessert Buffet: Include Hydrangea Cakes as part of a larger dessert table featuring assorted treats like macarons and chocolates.
- Themed Parties: Match the colors of the cakes with your party theme for a cohesive look.
How to Perfect Hydrangea Cakes
To make your Hydrangea Cakes truly special, pay attention to these essential tips. These insights will help you achieve that perfect look and taste.
- Bold Colors: Use gel food coloring to achieve vibrant shades. Start with small amounts and gradually add until you reach your desired hue.
- Even Layers: Ensure your cake layers are evenly baked by rotating them halfway through baking. This promotes uniformity and prevents doming.
- Chill Before Frosting: Cool your cakes completely before frosting. This helps prevent melting and creates clean edges when decorating.
- Use Piping Bags: For detailed flower designs, use piping bags fitted with petal tips. This technique allows for precise control over the frosting shape.
Best Side Dishes for Hydrangea Cakes
Pairing side dishes with your Hydrangea Cakes can elevate your dessert experience. Here are some delightful options that complement their beauty and flavor well.
- Fresh Berries: A mix of strawberries, blueberries, and raspberries adds a refreshing tartness that pairs nicely with sweet cakes.
- Whipped Cream: Lightly sweetened whipped cream serves as a perfect topping or side to enhance texture.
- Fruit Sorbet: A scoop of fruit sorbet provides a cool contrast and brings out fruity undertones in the cake.
- Chocolate Truffles: Rich chocolate truffles add an indulgent twist that balances the floral sweetness of the cakes.
- Cheese Platter: A selection of mild cheeses can provide a savory counterpoint to the sugary cake.
- Nuts & Dried Fruits: A mix of nuts and dried fruits adds crunch and chewiness, offering different textures alongside the soft cake.
Common Mistakes to Avoid
Making Hydrangea Cakes can be a delightful experience, but certain mistakes can lead to less-than-perfect results. Here are some common pitfalls to avoid.
Skipping the egg whites step: Using fresh egg whites instead of pasteurized can compromise safety. Always use pasteurized liquid egg whites for the frosting.
Ignoring room temperature ingredients: Cold butter and eggs can lead to a dense cake. Ensure your butter and eggs are at room temperature for a lighter texture.
Overmixing the batter: Mixing too much can result in a tough cake. Mix until just combined to maintain a soft crumb.
Not measuring flour correctly: Scooping flour directly from the bag can lead to an inaccurate amount. Use the spoon-and-level method to measure your flour properly.
Using low-quality food coloring: Cheap food coloring may not provide vibrant colors. Opt for high-quality gel food coloring for a beautiful finish.
Refrigerator Storage
- Store Hydrangea Cakes in an airtight container.
- They will last up to 3 days in the refrigerator.
- Make sure they are completely cooled before storing to prevent moisture buildup.
Freezing Hydrangea Cakes
- Wrap individual cakes tightly in plastic wrap.
- Place them in an airtight freezer bag or container.
- They can be frozen for up to 2 months without losing flavor.
Reheating Hydrangea Cakes
Oven: Preheat your oven to 350°F (175°C). Wrap the cake in aluminum foil and heat for about 10-15 minutes.
Microwave: Place a slice on a microwave-safe plate. Heat for about 15-20 seconds on medium power, checking frequently.
Stovetop: Use a skillet over low heat. Cover with a lid and warm for about 5 minutes, ensuring it doesn’t burn.
Frequently Asked Questions
What are Hydrangea Cakes?
Hydrangea Cakes are beautiful miniature cakes designed to resemble hydrangea flowers. They feature colorful frosting and swirls of cake inside, making them visually stunning and delicious.
Can I customize my Hydrangea Cakes?
Yes! You can change the gel food coloring to create different flower colors or even mix flavors into the cake batter for unique tastes.
How do I achieve the perfect frosting consistency for Hydrangea Cakes?
Make sure your butter is at room temperature and gradually add powdered sugar until you reach a smooth, spreadable consistency without being runny.
How long does it take to make Hydrangea Cakes?
The entire process takes around 155 minutes, including prep and cooking time, but the results are worth every minute!
Final Thoughts
Hydrangea Cakes are not only visually appealing but also versatile in flavor and design. These delightful treats are perfect for any occasion, from spring gatherings to birthday parties. Feel free to customize them with different colors and flavors, making them uniquely yours. Give this recipe a try and impress your friends and family with your baking skills!
Hydrangea Cakes
- Total Time: 1 hour 5 minutes
- Yield: Approximately 12 mini cakes 1x
Description
Indulge in the exquisite beauty and flavors of Hydrangea Cakes! These delightful miniature cakes are designed to resemble blooming hydrangea flowers, making them a stunning centerpiece for any celebration, from birthdays to weddings. The vibrant colors and delicious taste will surely impress your guests. Best of all, creating these edible flowers is a fun and rewarding experience that brings friends and family together in the kitchen. With easy-to-follow steps, you can customize flavors and colors, ensuring each cake is uniquely yours. Embrace the art of baking with this captivating recipe!
Ingredients
- 10.5 oz granulated sugar
- 10.5 oz cake flour
- 4 tsp baking powder
- 3/4 tsp salt
- 4 fl oz egg whites
- 8 fl oz milk
- 1 TBSP vanilla extract
- 6 oz unsalted butter
- Assorted gel food coloring (e.g., Electric Purple, Regal Purple, Sky Blue, Soft Pink)
- For frosting: 6 fl oz liquid egg whites, 24 oz powdered sugar, 24 oz unsalted butter
Instructions
- Preheat oven to 350°F (175°C) and prepare miniature cake pans by greasing and dusting with flour.
- In a large mixing bowl, combine flour, baking powder, and salt.
- In a stand mixer, cream butter and sugar until light and fluffy.
- Gradually add egg whites, milk, and vanilla; mix well.
- Combine dry ingredients with the wet mixture until just blended.
- Divide batter into bowls; tint with gel food coloring.
- Fill prepared pans with alternating colored batter and swirl gently.
- Bake for 30–35 minutes or until a toothpick comes out clean.
- Cool cakes completely before frosting.
- Prep Time: 30 minutes
- Cook Time: 35 minutes
- Category: Dessert
- Method: Baking
- Cuisine: American
Nutrition
- Serving Size: 1 mini cake pop - approx. 45g
- Calories: 170
- Sugar: 15g
- Sodium: 120mg
- Fat: 8g
- Saturated Fat: 5g
- Unsaturated Fat: 2g
- Trans Fat: 0g
- Carbohydrates: 22g
- Fiber: <1g
- Protein: 2g
- Cholesterol: 20mg
Keywords: Use high-quality gel food coloring for vibrant results. Ensure all ingredients are at room temperature for better mixing. Consider adding lemon zest or almond extract for flavor variations.