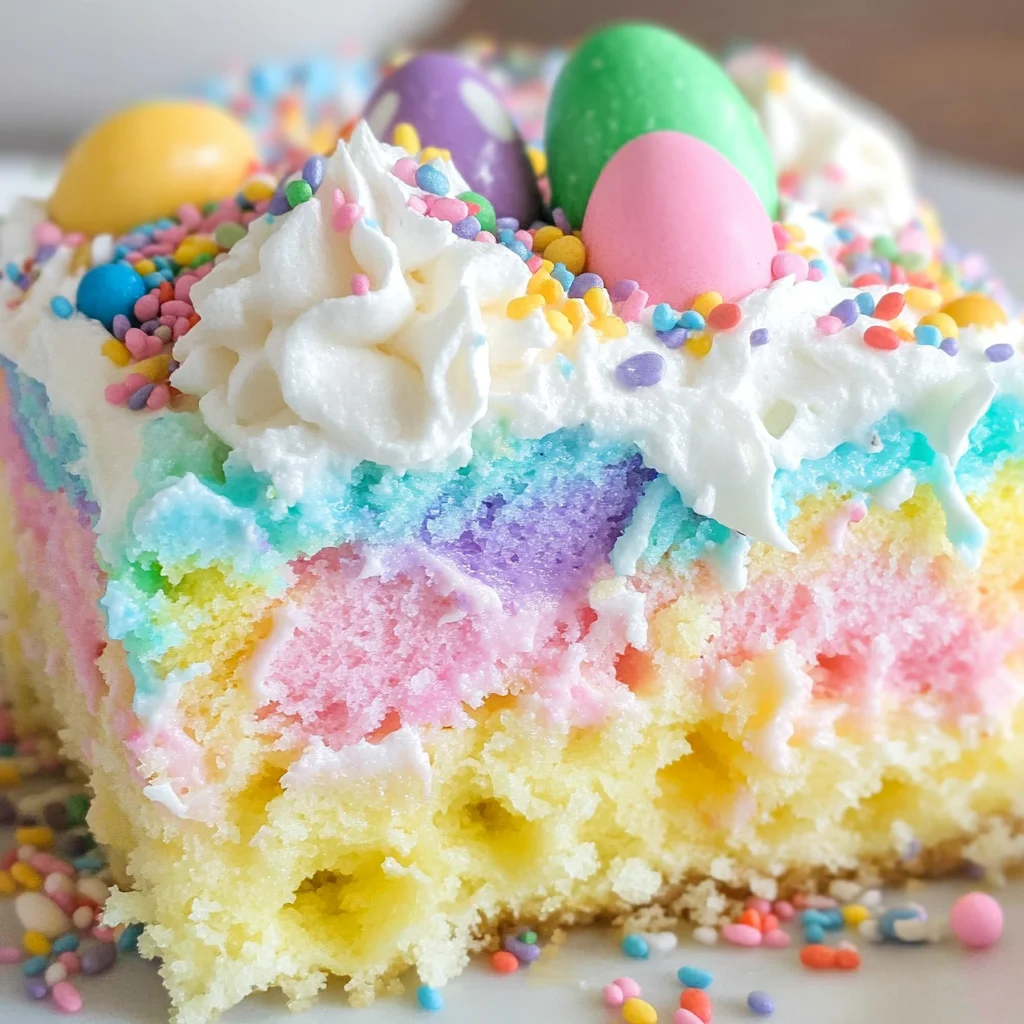
This Easter Poke Cake is the perfect centerpiece for your holiday dessert table. With its vibrant colors and layers of sweet flavors, it captures the spirit of Easter beautifully. Moist cake, creamy pudding, and fluffy whipped cream come together to create a delightful treat that will impress family and friends. Not only is this cake a feast for the eyes, but it’s also easy to make, making it suitable for various occasions beyond Easter.
Why You’ll Love This Recipe
- Colorful Presentation: The use of gel food coloring creates a stunning visual effect that delights everyone.
- Simple to Prepare: With just a few steps, this poke cake is easy enough for bakers of all levels.
- Customizable Toppings: Add your favorite sprinkles or candies for a personal touch that makes each cake unique.
- Rich Flavor Combination: The layers of vanilla pudding and whipped cream complement the moist cake perfectly.
- Perfect for Sharing: This recipe serves 12, making it ideal for gatherings and celebrations.
Tools and Preparation
Having the right tools can make your baking experience smoother and more enjoyable. Here’s what you’ll need to prepare this Easter Poke Cake.
Essential Tools and Equipment
- Mixing bowls
- Electric mixer
- Measuring cups and spoons
- 9×13 inch baking pan
- Whisk
Importance of Each Tool
- Mixing bowls: Essential for combining ingredients without spills.
- Electric mixer: Saves time and energy when whipping cream or mixing batter.
- Measuring cups and spoons: Ensures accurate ingredient amounts for consistent results.

Ingredients
This Easter Poke Cake is made with simple ingredients that create delicious layers of flavor.
For the Cake
- 15.25 ounce white cake mix
- 3 egg whites
- ½ cup vegetable oil
- ½ cup greek yogurt
- ¾ cup whole milk
- pink, yellow, and blue gel food coloring
For the Pudding Layer
- 5.1 ounces instant vanilla pudding mix
- 2 ¾ cups whole milk
For the Topping
- 2 cups heavy cream
- 3 Tablespoons granulated sugar
- 1 cup sweetened shredded coconut
- Easter sprinkles and/or candy (optional topping)
How to Make Easter Poke Cake
Step 1: Prepare the Cake Batter
- Preheat your oven to 350°F (175°C).
- In a large mixing bowl, combine the white cake mix, egg whites, vegetable oil, Greek yogurt, and whole milk.
- Mix well using an electric mixer until smooth.
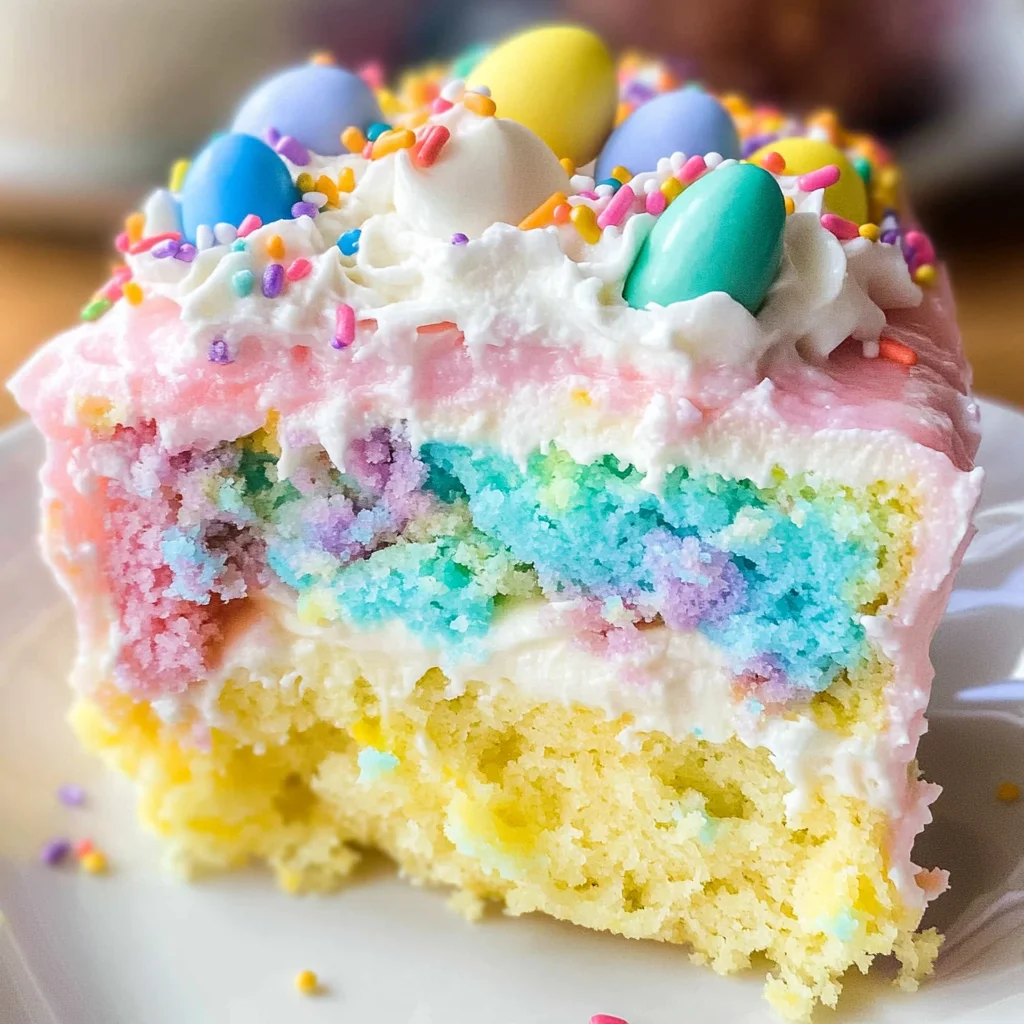
- Divide the batter into three bowls. Use gel food coloring to tint each bowl pink, yellow, or blue.
Step 2: Bake the Cake
- Pour each colored batter into the prepared 9×13 inch baking pan in alternating sections.
- Swirl gently with a knife to create a marbled effect if desired.
- Bake in preheated oven for 25 minutes or until a toothpick inserted in the center comes out clean.
Step 3: Prepare the Pudding Layer
- In another bowl, whisk together instant vanilla pudding mix and 2 ¾ cups of whole milk.
- Let it sit for about 5 minutes until it thickens.
Step 4: Assemble the Cake
- Once the cake has cooled completely, poke holes all over its surface using a fork.
- Pour the thickened pudding over the top of the cake evenly so it seeps into the holes.
Step 5: Make Whipped Cream Topping
- In a mixing bowl, beat heavy cream with granulated sugar until stiff peaks form.
- Spread whipped cream over the pudding layer.
Step 6: Add Finishing Touches
- Sprinkle sweetened shredded coconut on top of the whipped cream.
- Decorate with Easter sprinkles and mini eggs if desired.
This Easter Poke Cake is now ready to serve! Enjoy this delightful dessert at your next gathering or family celebration!
How to Serve Easter Poke Cake
Easter Poke Cake is a delightful dessert that can brighten up any celebration. It’s versatile and can be served in various ways to suit your gathering.
Individual Slices
- Serve each slice on a colorful plate to enhance the festive appeal.
- Add a dollop of whipped cream on top for added creaminess.
Mini Cups
- Cut the cake into small squares and place them in clear cups.
- Layer with whipped cream and coconut for an eye-catching presentation.
Family Style
- Present the whole cake on a decorative platter.
- Allow guests to serve themselves, making it easy and casual.
With Fresh Fruits
- Pair slices of cake with fresh berries or sliced fruits for a refreshing contrast.
- This adds a burst of flavor and color to each serving.
For Kids’ Parties
- Top slices with extra Easter sprinkles or mini chocolate eggs to attract kids.
- Serve alongside fun beverages like fruit punch for a joyful experience.
How to Perfect Easter Poke Cake
Making the perfect Easter Poke Cake requires a few simple tips. Follow these guidelines for a moist and flavorful cake.
- Use fresh ingredients: Ensure your eggs, milk, and yogurt are fresh for the best flavor and texture.
- Don’t skip the pudding: The instant vanilla pudding adds richness and moisture; make sure it’s well mixed.
- Chill before serving: Letting the cake chill for a few hours enhances its flavors and makes it easier to slice.
- Experiment with colors: Feel free to adjust the quantities of gel food coloring for different pastel shades.
- Whip cream properly: Beat heavy cream until stiff peaks form, ensuring it holds its shape when layered on the cake.
Best Side Dishes for Easter Poke Cake
To complement your Easter Poke Cake, consider these delicious side dishes. They’ll create a well-rounded dessert table that everyone will enjoy.
- Spring Vegetable Salad: A fresh mix of seasonal greens and vegetables drizzled with light vinaigrette.
- Roasted Asparagus: Tender asparagus spears roasted with olive oil and garlic, adding a savory touch.
- Honey Glazed Carrots: Sweet carrots sautéed with honey and herbs provide a lovely contrast to the cake’s sweetness.
- Garlic Mashed Potatoes: Creamy mashed potatoes with garlic offer comfort alongside your dessert spread.
- Fruit Salad: A vibrant mix of seasonal fruits brings freshness and balances out the richness of the cake.
- Zesty Coleslaw: Crunchy coleslaw with a tangy dressing adds texture and brightness to your meal.
Common Mistakes to Avoid
When making your Easter Poke Cake, avoiding common mistakes can elevate your dessert experience.
- Incorrect measuring: Accurate measurements are essential for baking success. Use proper measuring cups and spoons to ensure you get the right quantities.
- Under-mixing the batter: Failing to mix the batter thoroughly can lead to uneven texture. Mix until all ingredients are incorporated for a smooth consistency.
- Skipping the cooling time: Rushing the cooling process can affect the pudding absorption. Allow your cake to cool completely before adding any toppings.
- Using low-quality food coloring: Poor-quality gel food coloring can result in dull colors. Invest in good gel colors for vibrant and festive hues.
- Not chilling the cake long enough: Chilling allows flavors to meld and ensures a perfect texture. Refrigerate your cake for at least 4 hours before serving.
Storage & Reheating Instructions
Refrigerator Storage
- Store your Easter Poke Cake in an airtight container.
- It will last up to 3 days in the fridge.
Freezing Easter Poke Cake
- Wrap individual slices in plastic wrap, then place them in a freezer-safe container.
- Frozen cake can be stored for up to 2 months.
Reheating Easter Poke Cake
- Oven: Preheat the oven to 350°F (175°C) and heat for about 10-15 minutes until warm.
- Microwave: Place a slice on a microwave-safe plate and heat for 20-30 seconds or until warm.
- Stovetop: Use a skillet over low heat, cover with a lid, and warm for about 5 minutes.
Frequently Asked Questions
Here are some common questions about making this delightful Easter Poke Cake.
How do I make my Easter Poke Cake more colorful?
You can achieve vibrant colors by using gel food coloring and mixing it into different sections of the batter before baking.
Can I use a different pudding flavor for my Easter Poke Cake?
Yes! Feel free to experiment with flavors like chocolate or lemon pudding to customize your dessert.
How do I prevent my cake from sticking?
Grease your baking pan well with cooking spray or butter, and flour it lightly to help prevent sticking.
What is the best way to decorate my Easter Poke Cake?
Top your cake with whipped cream, shredded coconut, and colorful sprinkles or mini eggs for a festive look.
Final Thoughts
This Easter Poke Cake is not only visually stunning but also deliciously moist. Its versatility allows for various customization options, so feel free to adjust flavors or toppings according to your preference. Enjoy this delightful treat with family and friends during your Easter celebrations!

Easter Poke Cake
- Total Time: 45 minutes
- Yield: Approximately 12 slices 1x
Description
This vibrant Easter Poke Cake is a delightful centerpiece for any celebration. With its colorful layers and rich flavors, it captures the essence of spring in every bite. The moist vanilla cake, infused with playful pastel colors, is generously soaked with creamy vanilla pudding and topped with light whipped cream. Finished off with sweetened coconut and festive sprinkles, this dessert not only looks stunning but is also incredibly easy to make. Perfect for gatherings or family celebrations, it’s sure to impress both kids and adults alike!
Ingredients
- 15.25 oz white cake mix
- 3 egg whites
- ½ cup vegetable oil
- ½ cup Greek yogurt
- ¾ cup whole milk
- Pink, yellow, and blue gel food coloring
- 5.1 oz instant vanilla pudding mix
- 2 ¾ cups whole milk (for pudding)
- 2 cups heavy cream
- 3 tbsp granulated sugar
- 1 cup sweetened shredded coconut
Instructions
- Preheat your oven to 350°F (175°C).
- In a mixing bowl, combine the cake mix, egg whites, vegetable oil, Greek yogurt, and whole milk. Mix until smooth.
- Divide the batter into three portions and color each with gel food coloring.
- Pour the colored batter into a greased 9×13 inch baking pan in alternating sections and swirl gently.
- Bake for about 25 minutes or until a toothpick comes out clean.
- For the pudding layer, whisk the pudding mix with 2¾ cups of whole milk until thickened; let it sit for five minutes.
- Once the cake has cooled completely, poke holes in it and pour the pudding over the top.
- Beat heavy cream with sugar until stiff peaks form and spread over the pudding layer.
- Top with sweetened coconut and decorations as desired.
- Prep Time: 20 minutes
- Cook Time: 25 minutes
- Category: Dessert
- Method: Baking
- Cuisine: American
Nutrition
- Serving Size: 1 serving
- Calories: 210
- Sugar: 22g
- Sodium: 150mg
- Fat: 10g
- Saturated Fat: 6g
- Unsaturated Fat: 3g
- Trans Fat: 0g
- Carbohydrates: 29g
- Fiber: <1g
- Protein: 2g
- Cholesterol: 30mg
Keywords: Use fresh ingredients for better flavor. Chill the cake for at least four hours before serving for enhanced taste. Customize by using different pudding flavors or toppings.